
Pipelines recently cut a lot of time out of our builds and deployments, and I’d like to talk a bit about a couple of the big takeaways that were the root of the benefit. One of the fundamental programming lessons you learn early on aside from KISS is the DRY principle.
DRY – “Dont repeat yourself.” Or to put in a clearer perspective here, don’t copy and paste.
In a deployment system with multiple environments it’s easy to just copy a working job into a new environment. The problem with this is keeping track of the changes between environments. It could be argued that you could have a single set of jobs that deploys to all environments, but realistically that approach provides very little visibility into what assets have been deployed, when, and to which environments. Keeping the jobs separate makes it easy to see when a specific environment has been deployed, such as Dev, Staging, or Production without having to dig too deeply into the details. A set of custom views augments this benefit as well.
Using the additional jobs for different environments approach works, but it becomes pretty easy to start modifying stuff for a single environment, and then the paths begin to diverge. Worse, it leads to having individual variables and settings throughout the job based on the environment. Which creates the nightmare spaghetti environment where it’s easy to accidentally deploy something to the wrong place (from copy/paste), or miss out on things like adding steps or tests in one environment or another.
Pipelines turn the core of jobs into code which provides the ability to centralize the jobs without impacting the ability to view deployments by environment. In fact, it turns the job itself into more or less, a view.
Using Pipelines
Getting started is as simple as installing the Pipeline plugin(s) and creating a new Pipeline Job. The syntax is somewhat different than a normal job. The git repo for example is generally managed in the code. You will need to set up the polling or trigger polling in the main job file. The next thing that is significantly different than the normal Jenkins Job is the Pipeline box which provides the ability to either pull the pipeline from Git, or if you prefer you can manually enter your code into the box on the page. It’s worth noting at the bottom of the box is a “Pipeline Syntax” which is a terrific help utility for identifying the syntax of specific Jenkins actions written in script.
Pipeline jobs allow you to specify parameters which you can then override in code as needed. The parameters are passed to the script, can be set with default values per job, and can be referenced using the “env.VARNAME” syntax inside the scripts. To add a parameter simply click the “This project is parametized” checkbox and it will offer an “Add Parameter” selector.
Lets walk through a quick example of using parameters with your scripts. First choose the type of parameter you want, in our case we will set the environment to be passed in with a String comparison. So select the String Parameter selector, then add the name as “CURRENT_ENVIRONMENT” and the value as “a test value”.

Next add “echo env.CURRENT_ENVIRONMENT” into the script window. When you are ready to turn this into a “Jenkinsfile” you can simply copy and paste the whole script into a file and check it into your Git repository as “Jenkinsfile”. This makes it easy to test scripts before deploying them. You can even add libraries and external code during the execution of these scripts to make common functions and libraries easier to use.

Imagine if you had several environments you are managing via Ansible. You can easily manage your inventory and execution with a script calling Ansible inventory and playbooks by environment with a script like this:

A couple of interesting bits from the above script that are worth noting: the “node {“ section. Anytime you see “node” as the wrapper it’s basically saying the code should execute on a node. This is important if you need things like assets in a multiple Jenkins worker environment. You can put code outside of these sections and it appears to be treated in the normal Globals hierarchy.
Next, notice the definition for the CURRENT_ENVIRONMENT. It can be assigned, tested against, etc., as any normal String variable. Then it’s carried into a try catch expression allowing us to avoid throwing an error on the entire job if the Ansible section fails. This also allows us to choose how to handle it. It might be totally ok for certain components to not pass… or to throw a user dialog wait (yes you can actually make the job pause waiting for user input and even timeout!).
The Ansible execution is pretty clean to read in this case. I am used to munging shell scripts to execute my Ansible in the normal Jenkins Jobs. With Pipeline it is all native pipeline DSL (mostly groovy), nice and readable.
The last thing to take note of is that the Ansible Inventory and playbooks are both determined by the environment. (You can also check the playbook into your source code. We chose to use a centralized Ansible repo with distinct folders to leverage group_vars by environment without digging all over the place).
The important takeaway is that I am now free to make a bunch of jobs in Jenkins that all reference this core pipeline file. The jobs themselves essentially become views and simple argument executors for the environment in question.
This approach cut down on the number of jobs we need to make custom changes to by 2/3rds, just in the jobs themselves. The best part is you can actually execute additional jobs based on logic (it’s named pipeline for a reason). So many of the gateway jobs we had went away as well, further reducing the potential for breakage during changes and deployments.
Protip: name the pipeline file (usually named “Jenkinsfile”) with a .groovy extension and vim will respect the encodings making it much easier to read from the command line.
Parallelism
The last thing I want to cover is parallelism, as it cut our job execution times another 2/3rds. Especially important if you have jobs that rely on other jobs with a max concurrent executor per node. You can combine the “node” syntax and “parallel” to execute tasks concurrently on the same or different nodes. (You can also specify the node you want the code to run on if you have some meant for fast builds and some meant for slow building archive type jobs, but that’s another story). Here is the gist of it:
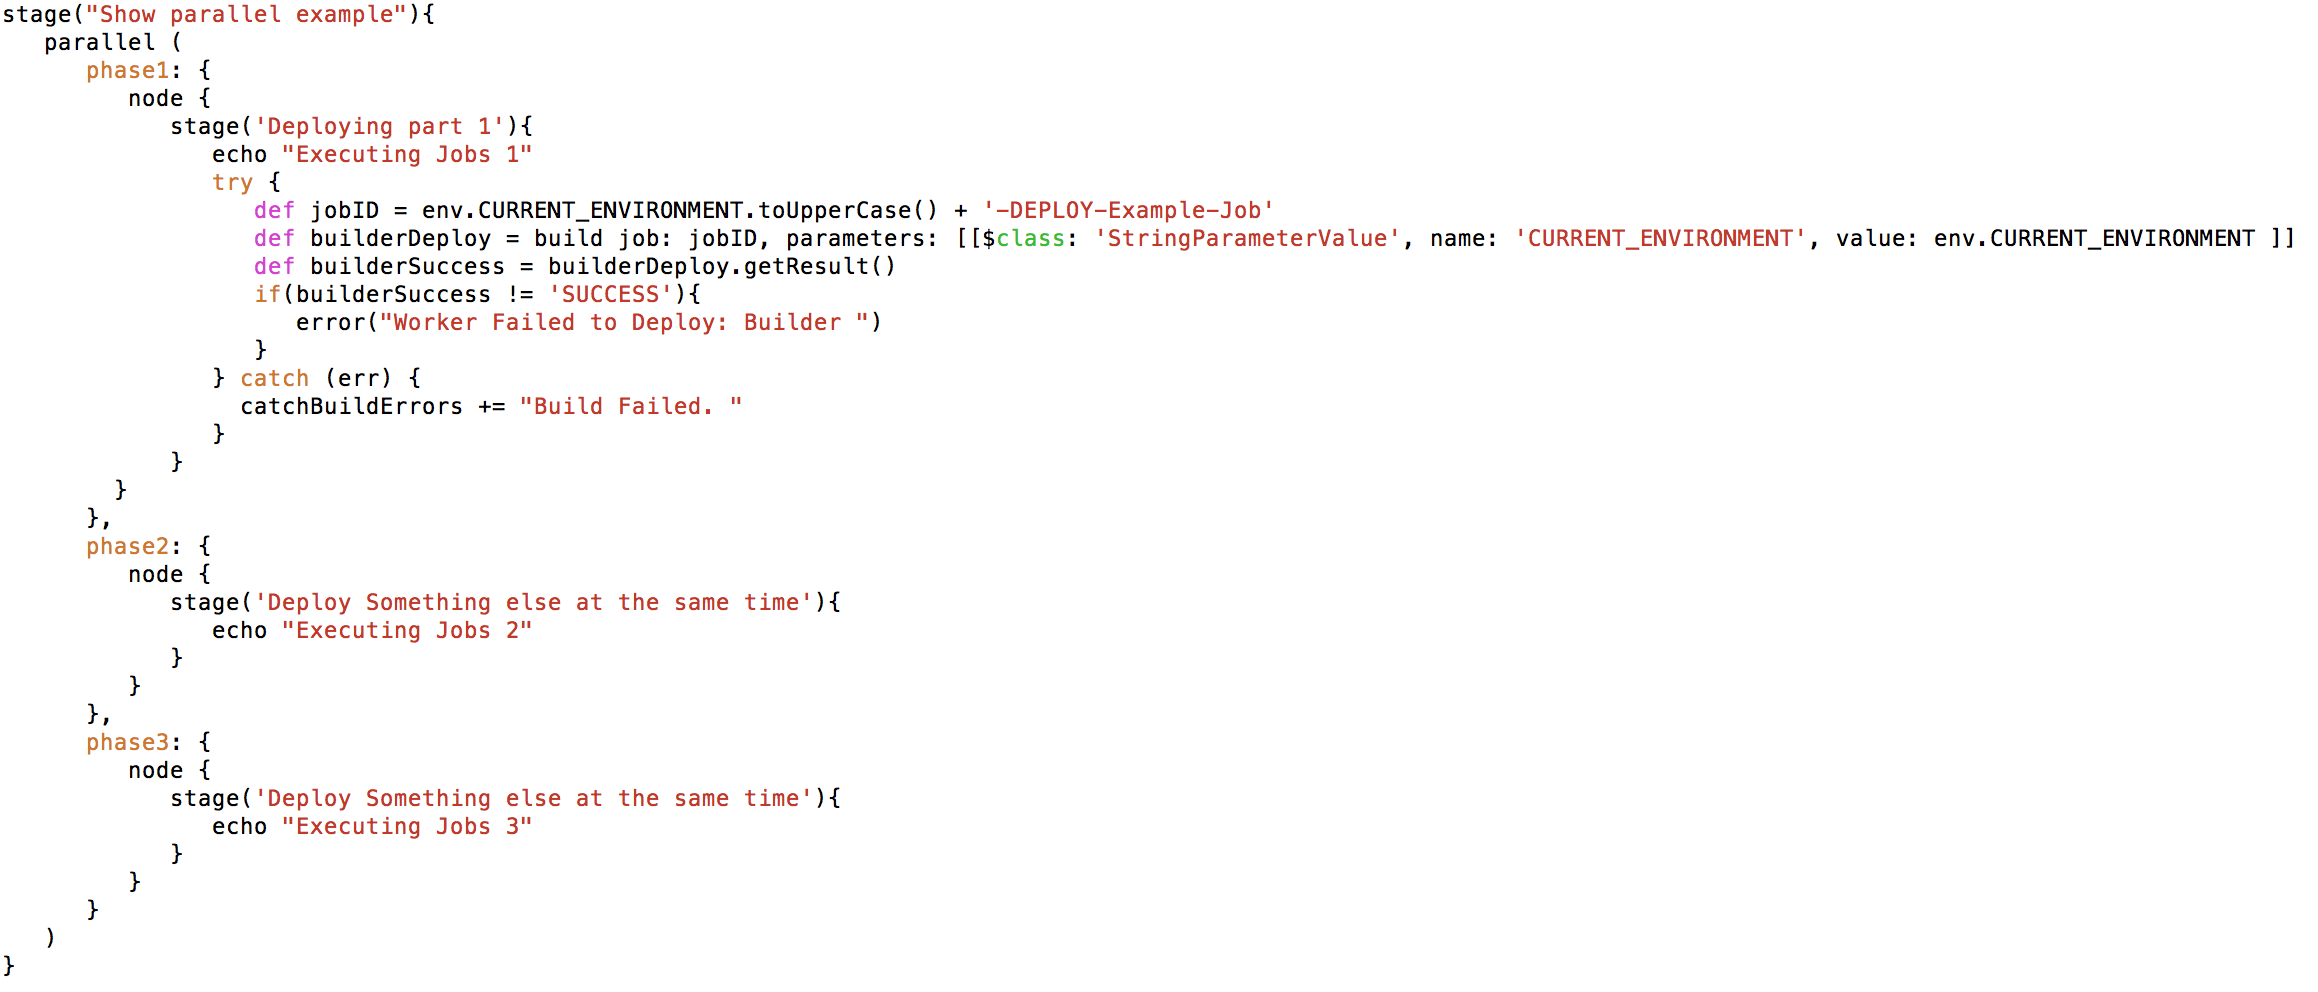
The core structure here is the “parallel {“ clause. If you fill that with a simple map as I have, each of the items inside will be executed concurrently in their own thread. This is really great for executing child build jobs in their own “stage” enclosure as it then displays in the interface.

Now that you have a pipeline as code you can check it into your project. Checking the pipeline into the project source code doesn’t just provide the ability to version the changes to the job as a great backup, it also means the job can change as it needs to by simply branching the code and changing it.
The one downside to that approach is it can prove a bit more difficult to track, especially in a largely distributed environment with lots of projects. As an alternative, since the pipelines can perform advanced behaviors with their far greater ability to control things, you could check the pipelines into something like a versioned git repository by release. So each required Jenkinsfile by environment has a custom name (related to the project most likely) and is in a version branch which can be checked out. I’m not going to get too far into this, as a lot of it depends on your project and personal preferences.
In Summary, Jenkins Pipeline makes managing lots of projects across multiple environments much simpler, faster, and gives you better visibility into the deployment execution process. Spending the time to understand the thought process behind it is well worth the effort. I would also highly recommend checking out some of the really amazing plugins like “BlueOcean” which provides a significantly enhanced user interface to the process.
I would also recommend investigating the multi-branch plugin as it is a well thought out approach to managing the intricacies of many user projects.
Good luck!


About The Author: James McDermott
James is a 20+ year high-tech veteran helping notable startups such as Redhat and Lulu in their early days as well as tech giants such as Teradata with their global data, analytics, and global infrastructure / services. James joined Dropsource early on in 2015 after quickly recognizing the incredible potential of the platform as a disruptive technology destined to make positive changes.
More posts by James McDermott